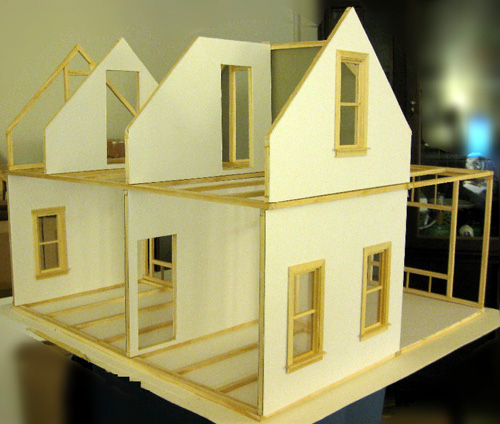
If you’ve visit the Greenleaf forums lately, I’m sure you’ve seen Mike’s post on his stick built, hollow wall custom dollhouse. He also has a blog that he regularly updates as well. I am learning so much on how to build a dollhouse with frames, similar to how you would build a human sized house. And this is just from the pictures alone! Mike is also great enough to answer questions about the building process should you have any.
I’ve thought about building a dollhouses this way, but it seemed too complicated and delicate of a building process. But Mike’s posts on and explanations makes it seem otherwise. With this building process, it seems like you can add architectural details, slopes, etc more easily to the build than if you would in a typical solid board-built dollhouse. Also, less (and lighter) material seems to be needed and it can probably be done with just a hobby knife or an Xacto knife, which makes it a very accessible building method for miniatures!
Oh yes, I am already dreaming of getting rid of the power tools for building.
The only negative I can think of is that it’s probably not sturdy enough for kiddies, but kiddies generally don’t care about the details, so I think this point is moot.
I am so inspired by Mike’s work and am EXTREMELY tempted to start ANOTHER building project. I most definetly will use the stick built, hollow wall process on another house after the Nyne is done, so this really helps motivate me to finish it!
Lastly, just a quick plug for Mike (not that he asked or even knows about this post). He has an Etsy shop. There is currently nothing listed, but he does take custom orders!


Thanks for the plug, Ann!
As for kid proof, good point by the way, I think once this dollhouse is glued together a child could sit on it. (Don’t quote me on that, LOL! More testing required.) I tried to twist one of the panels – couldn’t budge it – they’re remarkably & surprisingly strong. All I can think of is a sharp object cutting into the matboard, & that could be repaired like a real plaster wall.
It just takes a bit of extra time & patience building the sections, but when you finish one & see how neat & professional it looks, you’ll be inspired to do more & more!
My pleasure Mike! And yes, I can not wait to get started to see for myself! I really appreciate you sharing your knowledge with us. Thanks Mike!
Yup, I it’s more or less the technique I used for my dollhouse, just in a nastier way 😀
You get a very strong result if you have panel – inside structure – panel.
And possibilities are endless and you just need a cutter.
I don’t have any wood for the inside structure, just the foam card-board.
But in my case it’s important to put some heavy books in order to let it dry flat, otherwise it will twist.
I really need to make a simple tutorial on this 🙂
Oh yes, yes, yes! I’d love to see a tutorial from you! Heck, I think you should show more pictures of the house in general, but thats my opinion 😉
Yes, Mike, a video tutorial would be he bomb! I love watching these builds! It’s very helpful, and I will be making my own 1:6 Barbie doll house in the near future. ANY instruction visual or video would be fantastic!! I love your houses, by the way!!
Maggie