
I’ve recently had my first custom order on Etsy. Honestly, I’m still very new to Etsy, so it was pretty exciting to get a custom request.
It was for a set of two miniature planters in 1:12 scale, referencing the image above. I gave the buyer a quote based on the time I expected to take to finish it… but of course I have a wonderful knack for underestimating the time to make anything. Also in my excitement, I totally forgot to include the cost of materials as well. It was ony a few dollars, but it a few more bucks out of my own pocket.
Sure, I could have messaged her and ask to adjust the price, but I gave her a price, and by golly, I’m sticking to it.

I scrawled out my plans on paper since the project was simple enough to do so with. No need for fancy graph paper or software in this case. Now I know what to cut out and how many to cut out.

In order to save time (and money for the buyer), I scored the side slats to simulate it looking like individual pieces. With Basswood, its easy peasy to do with your Xacto knife and it looks great in scale IMO.

I also cut out the legs, the top, and bottom panel pieces with my little table saw and did a quick dry fit to see how it looks with the scored panels. I’m liking it so far.
The primary reason the project took much longer than expected is because the legs and such are 1/4″ thick and that is the very upper limit for my cheapo Proxxon table saw. I had to take the whole thing apart a few times to re-calibrate, because the angle of the blade kept shifting a few degrees outward after a few rip cuts of the thicker wood.
Speaking of the table saw, I owe you guys a review on it!

Here’s the assembly station. I just assembled everything with good old tacky glue and a bottle of paint for the pressure.

The main components are glued together and the planters are starting to take shape. Due to the table saw problems, the pieces were not perfectly cut to specifications, where some where off by up to half a millimeter. 0.5 mm doesn’t seem like much, it can become a problem when you are working in smaller scale.

Now is the time for the main assembly. This is where I get really excited because it is looking like starting to look like planter!
Following the reference, the top of the corners are not flush and rose above the sides by 1/16″.

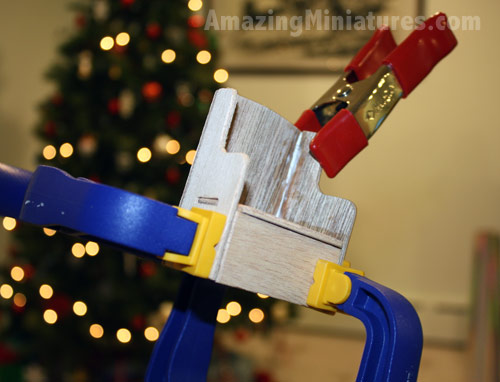
Some hot clamping action! This picture reminds me of a similar picture taken last year! I ought to make it into a yearly tradition lol.
You have to be careful clamping the softwoods like Basswood or Balsa. Its obviously not as dense as hardwoods (oak, maple, etc) so if you apply too much pressure, it WILL dent.
Note to self, I need to get better clamps. The C clamp in the picture is very heavy, clunky, and overall not ideal for softwoods.

And its done! I am super pleased with how it turned out… and was tempted to keep them for myself. >_<
All told, it took a little over 6 hours from the planning stages, to cutting, sanding, and assembly. It would have only been about 4 hours had there not been any technical difficulties with the saw, but who can ever predict those problems?
Do It Yourself!
If you would like to build your own planter, here are the dimensions of the parts:
- Corner/Legs: 1/4″ by 1/4″ by 1 1/2″ x4
- Long Top and Bottom: 1/4″ by 1/4″ by 2 1/4″ x4
- Short Top and Bottom: 1/4″ by 1/4″ by 1″ x4
- Large Panels: 1/8″ by 13/16″ by 2 1/4″ x4 (1/4″ width scores)
- Small Panels: 1/8″ by 13/16″ by 1″ x4 (1/4″ width scores)
The assembly is strait forward as you can follow along how I did it in the pictures. Also, if enough people want it, I can always try my hand at drafting up the plans in a PDF document.
Enjoy!
Ann, this is so cool! Thanks for sharing the plans. These planters would be perfect for the deck of the Highland! If I ever get back to working on it, that is.
And congrats on the custom order!
Thanks Lys!… I’ve actually been looking around for 1/4″ square dowel/rods so I can avoid actually ripping the 1/4″ wood. I think that would make things so much easier. HomeDepot carries it, but in my two trips there, I haven’t found it yet, maybe you’ll have better luck if you plan on building the planters!
Try to look in the area where the “trailer” trim is. I think that is where I have seen it before. Hope you had an awesome holiday!!!
May I suggest you add these to your Christmas list: http://www.micromark.com/MAGNETIC-GLUING-JIG-10-1and4-SQUARE,7038.html
http://www.micromark.com/MINI-4-CORNER-CLAMPS-1and2-x-1and2-TO-4-x-5-CAPACITY,7184.html
http://www.micromark.com/MINI-PLASTIC-CLAMP-SET-SET-OF-4,7471.html
🙂
Thanks SS, I’ve already been eying these clamps… *drool* at the square clamps!
I am such a dollhouse geek =X